Another LT1 Boost turbo build
#16
First round of pics (These will also get updated to the LTx forums).
Old AC Condenser versus new (33% less volume but ~10% more flow (less restrictive). The A/C will drop in total cooling capacity and require more airflow to cool the refrigerant. The reason I wanted to keep A/C was so that it could take the edge off the heat and be able to run the defroster sufficiently. I don't expect the interior to get "cold" but the guys at Vintage Air that helped me select the unit actually think it'll be extremely close to a stock unit with ~135k on it.

Old Rad versus new Rad. Dropped in height to go vertical and tuck into the front subframe. MUCH more volume. Most people around here go for the GRI-1-25241-X radiator, which is a dual 1" row. I went with the GRI-1-55241-X, which is a dual 1.25" row.

View looking down on the driver's side. Notice the *obvious* port in the downpipe for a wideband. Any dyno shop will pop the hood and go "Oh. There it is." That's good layout work right there.

I'm not quite the skinniest guy on the planet at 6ft and 200lb, but I can still do a plug change on the passenger side without getting under the car except to remove one bolt for the steering shaft. Partly due to the SLP headers as a base, partly the downpipe. The steering shaft pulls out the TOP of the engine bay, it just slides right past the SLP header.

Steering shaft in place, good fitment, plenty of room around it (not smacking into anything, and good room for the rag joint)

Looking up the drivers side through the BMR K-member.
**THE 3" DOWNPIPE IS IN THE CAR***

Here, again, looking from below. You can see the downpipe on the upper side of the picture. I did the full swap with it IN PLACE. That's some seriously good access, and will keep from toasting plugs and wires. While removing the downpipe isn't difficult, it means there is one less thing to have to do. Also, you can see easy access to the O2 sensor for the driver's side.

Back of the passenger side of the engine, easy O2 sensor access. The crossover pipe is installed, and was installed during plug installation. All I did was pull the lower downpipe (two bolts, routes around the front of the oil pan) and pulled the starter.

Looking up the passenger side between the block and the crossover pipe.

More in a bit!
Old AC Condenser versus new (33% less volume but ~10% more flow (less restrictive). The A/C will drop in total cooling capacity and require more airflow to cool the refrigerant. The reason I wanted to keep A/C was so that it could take the edge off the heat and be able to run the defroster sufficiently. I don't expect the interior to get "cold" but the guys at Vintage Air that helped me select the unit actually think it'll be extremely close to a stock unit with ~135k on it.
Old Rad versus new Rad. Dropped in height to go vertical and tuck into the front subframe. MUCH more volume. Most people around here go for the GRI-1-25241-X radiator, which is a dual 1" row. I went with the GRI-1-55241-X, which is a dual 1.25" row.
View looking down on the driver's side. Notice the *obvious* port in the downpipe for a wideband. Any dyno shop will pop the hood and go "Oh. There it is." That's good layout work right there.
I'm not quite the skinniest guy on the planet at 6ft and 200lb, but I can still do a plug change on the passenger side without getting under the car except to remove one bolt for the steering shaft. Partly due to the SLP headers as a base, partly the downpipe. The steering shaft pulls out the TOP of the engine bay, it just slides right past the SLP header.
Steering shaft in place, good fitment, plenty of room around it (not smacking into anything, and good room for the rag joint)
Looking up the drivers side through the BMR K-member.
**THE 3" DOWNPIPE IS IN THE CAR***
Here, again, looking from below. You can see the downpipe on the upper side of the picture. I did the full swap with it IN PLACE. That's some seriously good access, and will keep from toasting plugs and wires. While removing the downpipe isn't difficult, it means there is one less thing to have to do. Also, you can see easy access to the O2 sensor for the driver's side.
Back of the passenger side of the engine, easy O2 sensor access. The crossover pipe is installed, and was installed during plug installation. All I did was pull the lower downpipe (two bolts, routes around the front of the oil pan) and pulled the starter.
Looking up the passenger side between the block and the crossover pipe.
More in a bit!
#24
 Second to that, the kit was harder to work with for a "nice weather car". I wanted something that was just easier to work on (better plug & component access) and deal with every day and not constantly worry about how I'd get to one component or another.
I'm still waiting for the upper radiator hose to get here along with my silicone reducers and two final elbows, so the cold side piping isn't installed.
Vertical radiator - the real mounts need to get welded in (later this week) along with some steel to reinforce what I cut out of the front subframe. The extra fittings are getting welded to the radiator on Wednesday, so I'll finally be able to hook up the steam line from the heads.
The bottom of the radiator will slide another .75" forward, leaving plenty of room to get fans in there.
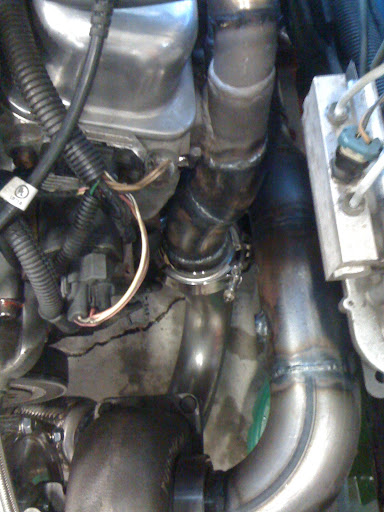
Looking up from the bottom at the turbo and wastegate. There is a turbo support bracket attached to the block in there.
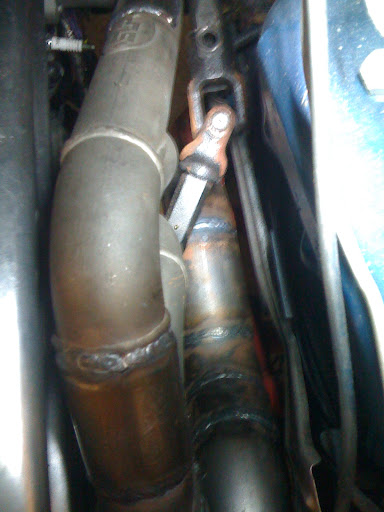
You can see the upper downpipe snaking along the frame rail...
Originally Posted by RealQuick
Bueller... Bueller.... Bueller
#25
Regarding the convertible x-brace, why not remove it and do a good set of subframe connectors? I ditched the chintzy stamp steel piece and use KBDD subframes and car is very very solid. I can jack the car up and open the doors with or w/o the top down. No issues.
Just a thought. Good looking build
Just a thought. Good looking build

#27
I've got BMR Convertible ones in there now. They made a serious improvement - but If I remove the X brace (which I have done before) there is a difference in the way the car handles and the way it "wobbles" after one of the rear wheels hits a pothole with the roof down. I wish I could have gotten KBDD's, but the car was in the shop getting the frame inspected after a fender bender and the guys I knew there would get the car on the rig and weld in subframe connectors [no charge] if I got them in time.
#29
The PTK is currently still up for sale.
https://www.camaroz28.com/forums/sho...d.php?t=755006
I'm currently fighting fuel issues and have been troubleshooting for a few days now - I think my acceleronics converter has died on me (though it is a Gen I unit and many years old) as I have a few cylinders firing and working properly, but I've got a buddy coming to help me out tomorrow to do a full tear down and inspection. If all goes well tomorrow, there'll be assembled pics with the intercooler and the engine running.
#30
Got the car back from the welding/chassis shop Friday at 5 - but then promptly got sicker than **** Sunday and have been in no capacity to do anything on the car till now. 
Latest round...
New upper crossmember - lower one has been cut out and reinforced as well. Vertical Radiator! The AC Condenser sits in front of the radiator, but isnt' installed yet.

The cover I used is actually an aftermarket polished radiator cover that I cut quite a few inches off. It works amazingly well and I think it looks great (ignore dayquil induced hammer marks). Talk about an easy way to secure the top!

Solid 2.5" of room between the turbo and the radiator at worst case. I can't quite fit both stock fans in there, but one stock and one slim goes great.

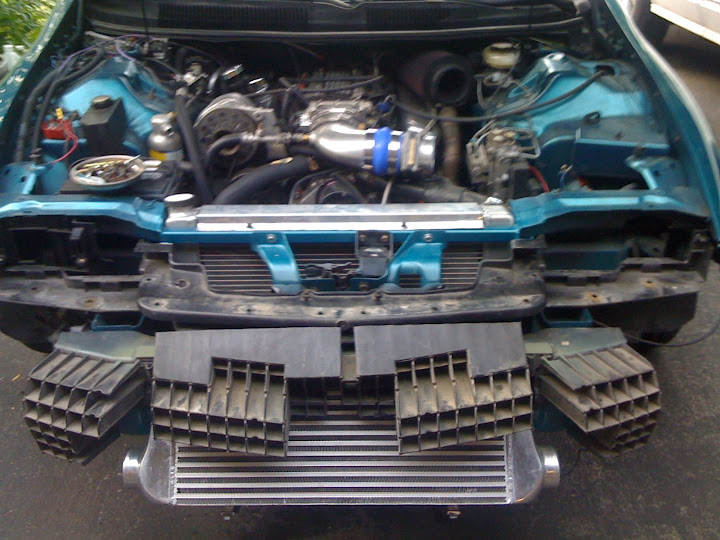
Bumper and Intercooler in place

Intercooler brackets are bolted (on top) to the bumper and welded on the bottom. Pop off the 4 bolts on top and the two on the bottom and the intercooler slides down and out. Brackets are 1/4" steel, so they're not going anywhere. Also, the placement and angle means the underside of the bumper pretty much retains the stock air routing to the air dam.

Had a steel plate welded in to replace material that had been cut away. I won't say the bumper is anywhere near as rigid as it was stock, but every little bit helps.

Upper side - had a steel bar welded to the top of the bumper core for added strength.

All assembled with Projector headlights...

I still have some gremlins to track down - There's an exhaust leak somewhere, and the poly locks on my rockers just won't stay adjusted. I torqued them per Comp's recommendations, but a few of them just came loose on their own.

Latest round...
New upper crossmember - lower one has been cut out and reinforced as well. Vertical Radiator! The AC Condenser sits in front of the radiator, but isnt' installed yet.
The cover I used is actually an aftermarket polished radiator cover that I cut quite a few inches off. It works amazingly well and I think it looks great (ignore dayquil induced hammer marks). Talk about an easy way to secure the top!
Solid 2.5" of room between the turbo and the radiator at worst case. I can't quite fit both stock fans in there, but one stock and one slim goes great.
Bumper and Intercooler in place
Intercooler brackets are bolted (on top) to the bumper and welded on the bottom. Pop off the 4 bolts on top and the two on the bottom and the intercooler slides down and out. Brackets are 1/4" steel, so they're not going anywhere. Also, the placement and angle means the underside of the bumper pretty much retains the stock air routing to the air dam.
Had a steel plate welded in to replace material that had been cut away. I won't say the bumper is anywhere near as rigid as it was stock, but every little bit helps.
Upper side - had a steel bar welded to the top of the bumper core for added strength.
All assembled with Projector headlights...
I still have some gremlins to track down - There's an exhaust leak somewhere, and the poly locks on my rockers just won't stay adjusted. I torqued them per Comp's recommendations, but a few of them just came loose on their own.


 Looks awesome!
