
Dissembling Heads, Valves Don't want to Drop out...need HELP
 05-08-2007, 03:32 PM
#1
Registered User
Thread Starter

Join Date: Feb 2002
Location: Ellensburg, WA
Posts: 378
Ok, so I was dissasembling my heads today before I take them to a machine shop for resurfacing. The deal is I have new springs/retainers/shims/keys/stem seals waiting to go in so I figured I might as well pull the old stuff off before dropping them off at the machine shop.
I pulled all the old springs, keys, retainers off without a hitch. And 13 of the valves slid right out without any problems. However, 3 of the intake valves on the same head won't slide out...I'm thinking there must be a small burr on the valve where the key holds it. I don't want to force it through the guide (since I'll be reusing the stock guids/seats). If there is a burr it's not visible to the eye, but when you pull the valve down I can hear metal to metal contact where it stops....therefore I'm assuming the lip of the valve stem where the keys lock into place has been pushed up, so as it does not want to slip through the guide.
My appoligies for incorrect terminology, etc. First time I've taken the heads all the way apart.
So...is there's a simple way to say attempt to deburr the top of the valve stem? or would this perhaps risk damaging the valve and screw up the keys locking ability?
Thanks,
Andrew
 05-08-2007, 03:44 PM
#2
Registered User

Join Date: Dec 1969
Location: PORTLAND, OR, MULTNOMAH
Posts: 3,499
So you are not getting them ported or anything----just surfacing (why just sufacing)? And if you are going to take it to a machinist, I would leave the valves in and let them take them out. Also, I assume that you know which valve went where when you removed the others---if not then the point is moot. If you did, then label the ones that are still in there so when the machinist takes them out you will know from where.
I personally believe that if one is going to remove the heads, that it is only reasonable to do at least some pocket work while they are in the shop. The onlly reason I can see for resurfacing is to raise the compression or because they are warped.JMHO
I personally believe that if one is going to remove the heads, that it is only reasonable to do at least some pocket work while they are in the shop. The onlly reason I can see for resurfacing is to raise the compression or because they are warped.JMHO
05-08-2007, 04:47 PM
#4
Registered User
Thread Starter
Join Date: Feb 2002
Location: Ellensburg, WA
Posts: 378
So you are not getting them ported or anything----just surfacing (why just sufacing)? And if you are going to take it to a machinist, I would leave the valves in and let them take them out. Also, I assume that you know which valve went where when you removed the others---if not then the point is moot. If you did, then label the ones that are still in there so when the machinist takes them out you will know from where.
I personally believe that if one is going to remove the heads, that it is only reasonable to do at least some pocket work while they are in the shop. The onlly reason I can see for resurfacing is to raise the compression or because they are warped.JMHO
I personally believe that if one is going to remove the heads, that it is only reasonable to do at least some pocket work while they are in the shop. The onlly reason I can see for resurfacing is to raise the compression or because they are warped.JMHO
The reason for resurfacing is because I had a small crack (there was a previous thread in regards to this problem) I've since had the crack welded; thereby requiring a resurfacing. Also, the freash surface will provide a very nice seal for my blown engine.
Seems I'll leave them as is, and let the machinist figure it out on my dime.
Thanks,
Andrew
05-08-2007, 04:53 PM
#5
Registered User
Join Date: Dec 1969
Location: PORTLAND, OR, MULTNOMAH
Posts: 3,499
Odds are that the side you had welded is the side that the valves won't drop, right. That being the case, you definitely want the machinist to remove the valves to determine the cause and the cure. Good luck.
05-08-2007, 09:57 PM
#7
Registered User
Thread Starter
Join Date: Feb 2002
Location: Ellensburg, WA
Posts: 378
I dropped them off at the machinist a couple hours ago. No, oddly enough the side the valves won't drop out of is not on the welded head. The welded head had no difficulties.
It cost me a grand total of $40.00 for the head repair (the welding).
My machinist said he will remove the valves and check it all out for me. I'm not worried, if something is seriously wrong with this set of heads the machinist should find it. I'll cross that bridge when I come to it.
It cost me a grand total of $40.00 for the head repair (the welding).
My machinist said he will remove the valves and check it all out for me. I'm not worried, if something is seriously wrong with this set of heads the machinist should find it. I'll cross that bridge when I come to it.
Last edited by AmericanMuscle33; 05-08-2007 at 09:59 PM.
05-08-2007, 10:10 PM
#9
Registered User
Thread Starter
Join Date: Feb 2002
Location: Ellensburg, WA
Posts: 378
05-08-2007, 11:33 PM
#10
Registered User
Join Date: May 2004
Location: Bay Area, CA
Posts: 2,001
It is very common to have the keeper groove edges flare out some, that is keeping the valve from dropping out. DO NOT force the valve out, you will groove the guide all the way down. Let the machinist remove them, he will just use a file and lightly spin the valve on the file to remove the burr.

 05-09-2007, 02:27 PM
#13
Registered User
Thread Starter
Join Date: Feb 2002
Location: Ellensburg, WA
Posts: 378
Well, I picked up the heads about 10 minutes ago. And yes it was just a simple flare where the keepers go. They filed it down and they dropped right out.
I'll post pictures when I get back from class (approx. 3 hrs from now).
I'll post pictures when I get back from class (approx. 3 hrs from now).
05-09-2007, 10:31 PM
#14
Registered User
Thread Starter
Join Date: Feb 2002
Location: Ellensburg, WA
Posts: 378
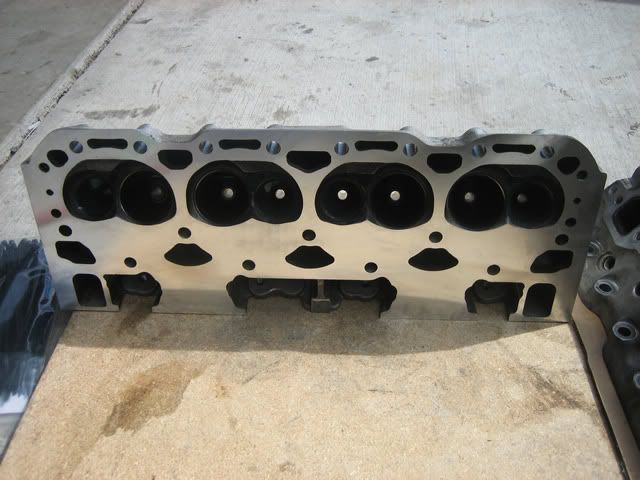
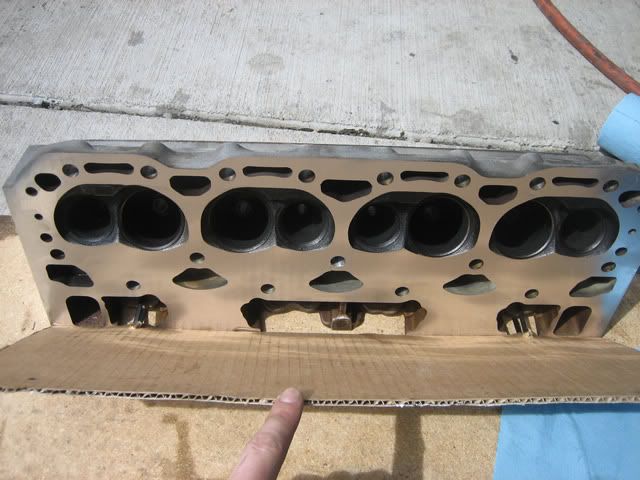
Here are some pics...took me longer than expected...I went out to take pictures and ended up assembling the heads before I came back in...
So here's pics of the new surface; followed by a before and after pic of the crack repair:
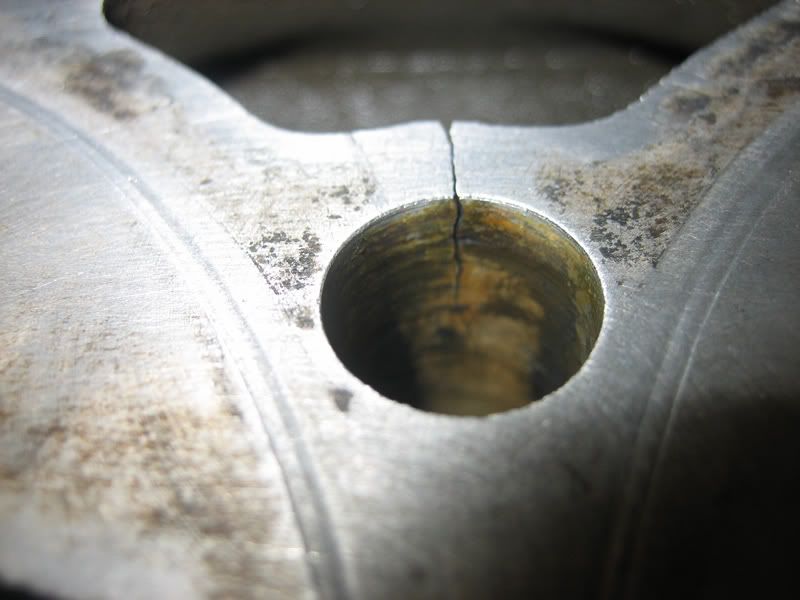
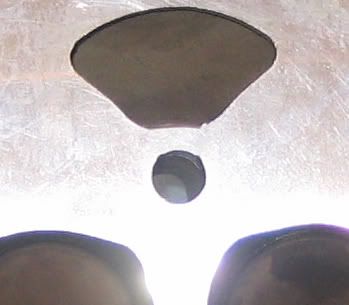
Sorry about the glare...I should have taken a better close-up of the crack repair...Regardless, it looks good in person.
So here's pics of the new surface; followed by a before and after pic of the crack repair:
Sorry about the glare...I should have taken a better close-up of the crack repair...Regardless, it looks good in person.
05-10-2007, 10:09 AM
#15
Registered User

Join Date: Jun 2003
Location: Carol Stream, Il.
Posts: 3,557
Here are some pics...took me longer than expected...I went out to take pictures and ended up assembling the heads before I came back in...
So here's pics of the new surface; followed by a before and after pic of the crack repair:
Sorry about the glare...I should have taken a better close-up of the crack repair...Regardless, it looks good in person.
So here's pics of the new surface; followed by a before and after pic of the crack repair:
Sorry about the glare...I should have taken a better close-up of the crack repair...Regardless, it looks good in person.