
Pics of the new set up

 04-19-2007, 10:45 AM
#17
Registered User

Join Date: Aug 2001
Location: Carlisle, PA
Posts: 874
Looks great, nice and clean.
Can't really tell from that one pic but it doesn't look like you have a gromet in the hole the fuel lines run through. You don't want it to rub and make a hole in the lines.
Can't really tell from that one pic but it doesn't look like you have a gromet in the hole the fuel lines run through. You don't want it to rub and make a hole in the lines.
04-19-2007, 11:14 AM
#18
Registered User

Join Date: Feb 2003
Location: Perry, GA
Posts: 216
Nice work man, I could swear that I have seen that kit somewhere before......
 I really am impressed with the amount of work that you have put in under the hood and I hope that she runs like a bat out of hell on the track. I also hope that you have as much fun with the kit as I did.
I really am impressed with the amount of work that you have put in under the hood and I hope that she runs like a bat out of hell on the track. I also hope that you have as much fun with the kit as I did.
04-19-2007, 04:43 PM
#19
Registered User
Thread Starter

Join Date: Nov 2002
Location: Knoxville tn.
Posts: 261
And thanks for the props guys.
04-19-2007, 05:00 PM
#20
Moderator
Join Date: May 2000
Location: Cinnaminson, NJ
Posts: 2,713
I have to ask... who's valve covers are you using? I bought the exact same covers for my motor but the original seller had no idea where they came from. They are on my motor now but I dont know who's they are. I think they are Canton SBC... am I right?
BTW, looks great!
BTW, looks great!
 you can eat off that thing !
04-19-2007, 08:11 PM
you can eat off that thing !
04-19-2007, 08:11 PM
#22
Registered User
Thread Starter
Join Date: Nov 2002
Location: Knoxville tn.
Posts: 261
I have to ask... who's valve covers are you using? I bought the exact same covers for my motor but the original seller had no idea where they came from. They are on my motor now but I dont know who's they are. I think they are Canton SBC... am I right?
BTW, looks great!
BTW, looks great!

 . Got a link?Whats JSG stand for?


 04-24-2007, 08:26 PM
#29
Registered User
Thread Starter
Join Date: Nov 2002
Location: Knoxville tn.
Posts: 261
Factory Fuel Line Mod
1. The first thing is to relieve the pressure off the shrader valve on the fuel line, located beside the fuel pressure regulator on the rear of the intake.
2. Remove the fuel lines using the correct fuel line disconnect tool.
3. Then remove fuel lines from clip on inner fender.
4. Then Jack up drivers side front, place jack stand under car and remove drivers side front wheel.
5. Then remove inner fender
6. At the point where the fuel lines go thru the inner fender you can there push the Grommet for the fuel lines out of fender.
7. Carefully cut the grommet on the bottom side and remove it from the lines. ( Do this in a neat way as this grommet will be reused)
8. Gently pull the fuel lines thru the inner fender.
Looking to down on the brake master cylinder, to the right of it there is a small flat area (see picture) and in this place you will drill a 2� hole from the inside of wheel well.
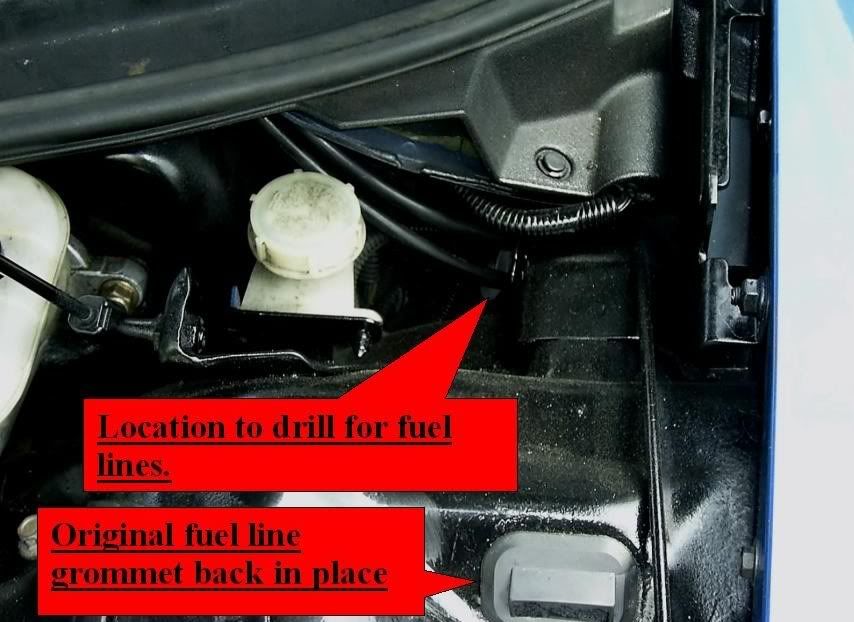
10. Then you will need a 2� grommet or rubber pipe coupler to place in the holes.
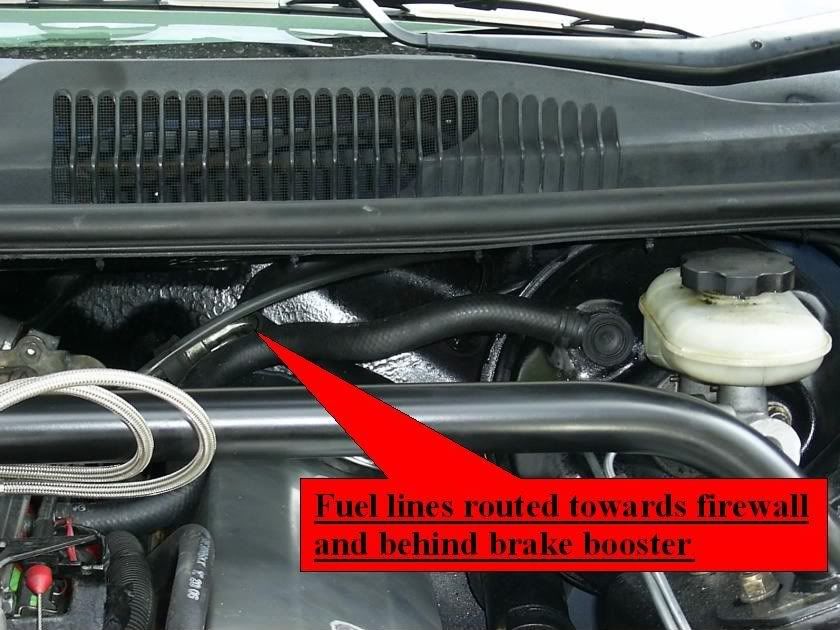
11. Then the part where you must be careful, the fuel lines can be kinked but if you take your time there is no issue. Gently push the fuel lines thru the grommet.
12. Then route them behind the power brake booster and come in from the back side of the intake.
13. Connect fuel lines up to the fuel rail.
14. Pull any slack back out from under hood, ensure lines are free and clear.
15. Carefully loop the fuel lines one time in a large loop. Then start where they come up from the subframe at thru the plastic holder and I used some zip ties about every 3��s around the loop keeping it uniform.
16. Then I mounted one bracket inside inner fender just to fasten the lines to in one spot and fastened them to it keeping it pulled tight against body.
17. Replace inner fender, replace tire, jack back up and remove stand, then lower car back on to ground.
18. Reinstall grommet in fender
19. Smile as you have just completed the mod.
I know this is not the best write up, but many asked about my set up so here is some info, I hope it is helpful to those who asked.
1. The first thing is to relieve the pressure off the shrader valve on the fuel line, located beside the fuel pressure regulator on the rear of the intake.
2. Remove the fuel lines using the correct fuel line disconnect tool.
3. Then remove fuel lines from clip on inner fender.
4. Then Jack up drivers side front, place jack stand under car and remove drivers side front wheel.
5. Then remove inner fender
6. At the point where the fuel lines go thru the inner fender you can there push the Grommet for the fuel lines out of fender.
7. Carefully cut the grommet on the bottom side and remove it from the lines. ( Do this in a neat way as this grommet will be reused)
8. Gently pull the fuel lines thru the inner fender.
Looking to down on the brake master cylinder, to the right of it there is a small flat area (see picture) and in this place you will drill a 2� hole from the inside of wheel well.
10. Then you will need a 2� grommet or rubber pipe coupler to place in the holes.
11. Then the part where you must be careful, the fuel lines can be kinked but if you take your time there is no issue. Gently push the fuel lines thru the grommet.
12. Then route them behind the power brake booster and come in from the back side of the intake.
13. Connect fuel lines up to the fuel rail.
14. Pull any slack back out from under hood, ensure lines are free and clear.
15. Carefully loop the fuel lines one time in a large loop. Then start where they come up from the subframe at thru the plastic holder and I used some zip ties about every 3��s around the loop keeping it uniform.
16. Then I mounted one bracket inside inner fender just to fasten the lines to in one spot and fastened them to it keeping it pulled tight against body.
17. Replace inner fender, replace tire, jack back up and remove stand, then lower car back on to ground.
18. Reinstall grommet in fender
19. Smile as you have just completed the mod.
I know this is not the best write up, but many asked about my set up so here is some info, I hope it is helpful to those who asked.
