
Front coil spring install guide??
 02-11-2007, 06:22 PM
#1
Registered User
Thread Starter
Join Date: Jun 2001
Location: WaTaUgA, Tx
Posts: 1,456
Front coil spring install guide??
Can someone hook me up? I cant find one that shows how to place the spring compresors. When I go to install the shock and spring assembley the compresor is hitting the upper a arm, not allowing it to line up with the stb holes? I am worn out and need some help.
Thanks,
Steve
Thanks,
Steve
 02-11-2007, 08:07 PM
#3
Registered User
Thread Starter
Join Date: Jun 2001
Location: WaTaUgA, Tx
Posts: 1,456
 No way! It wont even come close to fitting in there without the compressor. I am using stock springs.
 [/IMG]
02-11-2007, 09:10 PM
[/IMG]
02-11-2007, 09:10 PM
#5
Registered User
Thread Starter
Join Date: Jun 2001
Location: WaTaUgA, Tx
Posts: 1,456
1994 Pontiac Ta, I am going with Monroe Sensatrac shocks and struts. They are bone stock style, brand new struts. With it bolted onto the lower a arm, it is too tall to even think about installing with the spring not compressed? I really need to get these installed along with my racetronix fuel pump so I can set the car on the ground and focus on the motor.
Thanks for your help,
Steve
Thanks for your help,
Steve
 [/IMG]
02-11-2007, 09:30 PM
[/IMG]
02-11-2007, 09:30 PM
#7
Registered User
Join Date: Dec 1969
Location: Little Rock, AR
Posts: 27,714
The only time you should need the compressor is to disassemble the shock and spring. The compressor is not used when installing the unit back into the car. Did you separate any ball joints to get it out? If not, you may need to do so. Otherwise, you just need to pry the two a-arms apart as far as possible, so you can get the unit in. 4th gens have shocks, not struts.
02-11-2007, 09:39 PM
#8
Registered User
Thread Starter
Join Date: Jun 2001
Location: WaTaUgA, Tx
Posts: 1,456
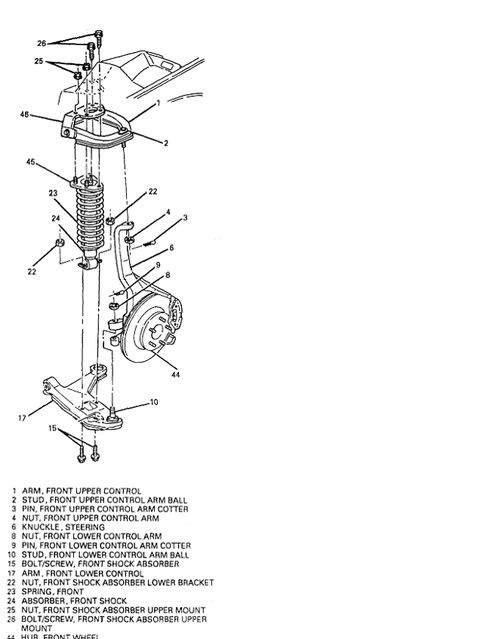
The a arms are off of a LS1 car. I was told this did not matter though? The ball joints look to be in great condition. The assembley will bolt on the lower a arm and fit good in the upper a arm. The strut mount (# 6) above is installed. I am going to try and pry the lower a arm down as shoebox suggested and see how that works?
Thanks amillion guys,
Long live CZ28!
Steve
Thanks amillion guys,
Long live CZ28!
Steve
 02-12-2007, 05:57 AM
#11
Registered User
Join Date: Jan 2005
Location: N Falmouth MA
Posts: 2,594
I have a write up on my cardomain site... http://www.cardomain.com/ride/463707/2
Also see... http://www.ls1howto.com/index.php?article=6
Also see... http://www.ls1howto.com/index.php?article=6
First, spray all bolts/nuts/ball joints that need to be removed ahead of time w/ some PB Blaster or WD-40. THis make life a little easier. ...
Up top, Remove shock tower brace (if you have one... IF you don't, remove the nuts where it would go. 2 nuts on front and 2 bolts on the back half. All 4 regular are bolts/nuts on the PASS side, no TX) On the driver's side (on LS1 models, not sure of LT1) you'll have to disconnect the master CYL from the power brake booster. In order to get it to slide out of the way so you can acess the TX bolt unbder it. It's easier to disconnect the ABS unit from the mount, lift it and slide it and the Master out of the power brake booster. Now you can get to the two TX bolts that are attached to the upper part of the Shock/spring assembly. The Torx bolts are TX-47. Disconnect the other two nuts on the front as well.
Once you get the wheels out of the way, first disconnect the bottom 2 shock bolts on the lower A-Arm. You could disconnect the sway bar mount, but I don't think it's nesessary (it could be rusted beyond repair anyway, I didn't do it), I don't think it's nesessary. Disconnect the Upper ball joint on the upper A arm. Key here is, PRY and whack the female end knuckle w/ a hammer a couple times, it should pop out (neat trick). After the steering assembly is out, pull the steering assembly off to one side, you can tie it to where you want it w/ some small rops/550 cord. This can get difficult. Pull the shock and spring assembly out from under the wheel well. (hard to explain. Pull down and out, and then pull the top of the shock up tword the top of the wheel well.)
You should have the strut LOOKING assembly out. (It's not a damn strut, NAPA!) Also: DO NOT TOUCH THAT MIDDLE NUT, YET!!! DON'T F*****G TOUCH IT!! I CAN'T STRESS THAT ENOUGH!! NOT YET!! ....... Anyway....... You can pull the upper plate/a-arm off of the top of the shock/spring assy. -Don't worry, it comes off. Now strap the spring compressors EVENLY on the springs and compress them till the spring pulls off of the bottom or top of the mounting surface.
!SPRING REMOVAL/COMPRESSION CAN BE VERY DANGEROUS. PERFORM AT YOUR OWN RISK. COMPRESSED SPRINGS POSSES A TREMENDOUS AMOUNT OF ENERGY AND SHOULD BE TREATED W/ RESPECT. A LOOSE SPRING CAN FLY OFF UNCONTROLLABLY AND CAN DAMAGE OR KILL....I HAVE BEEN TRAINED AT A TECHNICAL SCHOOL FOR THIS....PERFORM AT YOUR OWN RISK. I AM NOT RESPONSIBLE FOR ANY MISHAPS!
Now, once the spring is compressed and loose on the shock, disconnect the top middle nut that holds the top plate in place. If it is too rusted, you can cut the shock shaft w/ sawzall or whatever, if you are replacing the shocks (good time for it anyway). Remove spring and loosen the compressors. Remove brass cap on top of shock. Remove black spring seat plate on bottom of shock. It might need some persuasion, tap evenly on alternating sides to remove it. Replace parts in that order on new shocks. Compress new spring, place it over the new shock onto mounting plate, DON'T FORGET THE DUST COVER, AND THE RUBBER BUSHINGS! (Place the washer on first, then the dust cover) Once spring is compressed enough where the top plate and the dust cover meet (or until the top plate is on there as much as it will go, and the spring is loose), reinstall top middle nut. You don't have to tighten the SNOT out of it, just tighten it. You'll know when the top nut is tight (bottomed out). Align the spring w/ the lower rubber bushing. Re-install top A-Arm plate and install assembly back into car. You might have to turn the shock to get the top a-arm plate to align w/ the bottom shock holes. (you'll see) If you have to turn the shock, just place the bottom shock mount in something that won't move (vice works but DON'T Tighten it!) and turn the top w/ a pry bar. (between the bolts, it WILL go, or WD-40 it) Re-install top A-arm plate first then slide the bottom in. Bolt the bottom shock bolts in, then the ball joint. Then Re-install the top bolts.
Repeat for the other side.
Last edited by Bayer-Z28; 02-12-2007 at 07:59 AM.
 ... live and learn.
03-12-2007, 09:25 PM
... live and learn.
03-12-2007, 09:25 PM
#14
Registered User
Join Date: Jun 2002
Location: Mantua, NJ, USA
Posts: 548
Jeff
